GitHub Markdown, particularly GitHub Flavored Markdown (GFM), has become the standard tool for modern software development and technical documentation. As the world's largest code hosting platform, GitHub not only provides developers with powerful version control capabilities but has also revolutionized the way technical documentation is created and collaborated on through its unique Markdown implementation[1].
In today's software development ecosystem, clear, accurate, and maintainable documentation has become one of the critical factors for project success. GitHub Markdown not only inherits the simplicity and readability of traditional Markdown but also adds numerous extended features tailored to developers' needs, making it an indispensable documentation tool for everything from personal projects to enterprise-level applications.
Introduction to GitHub Markdown
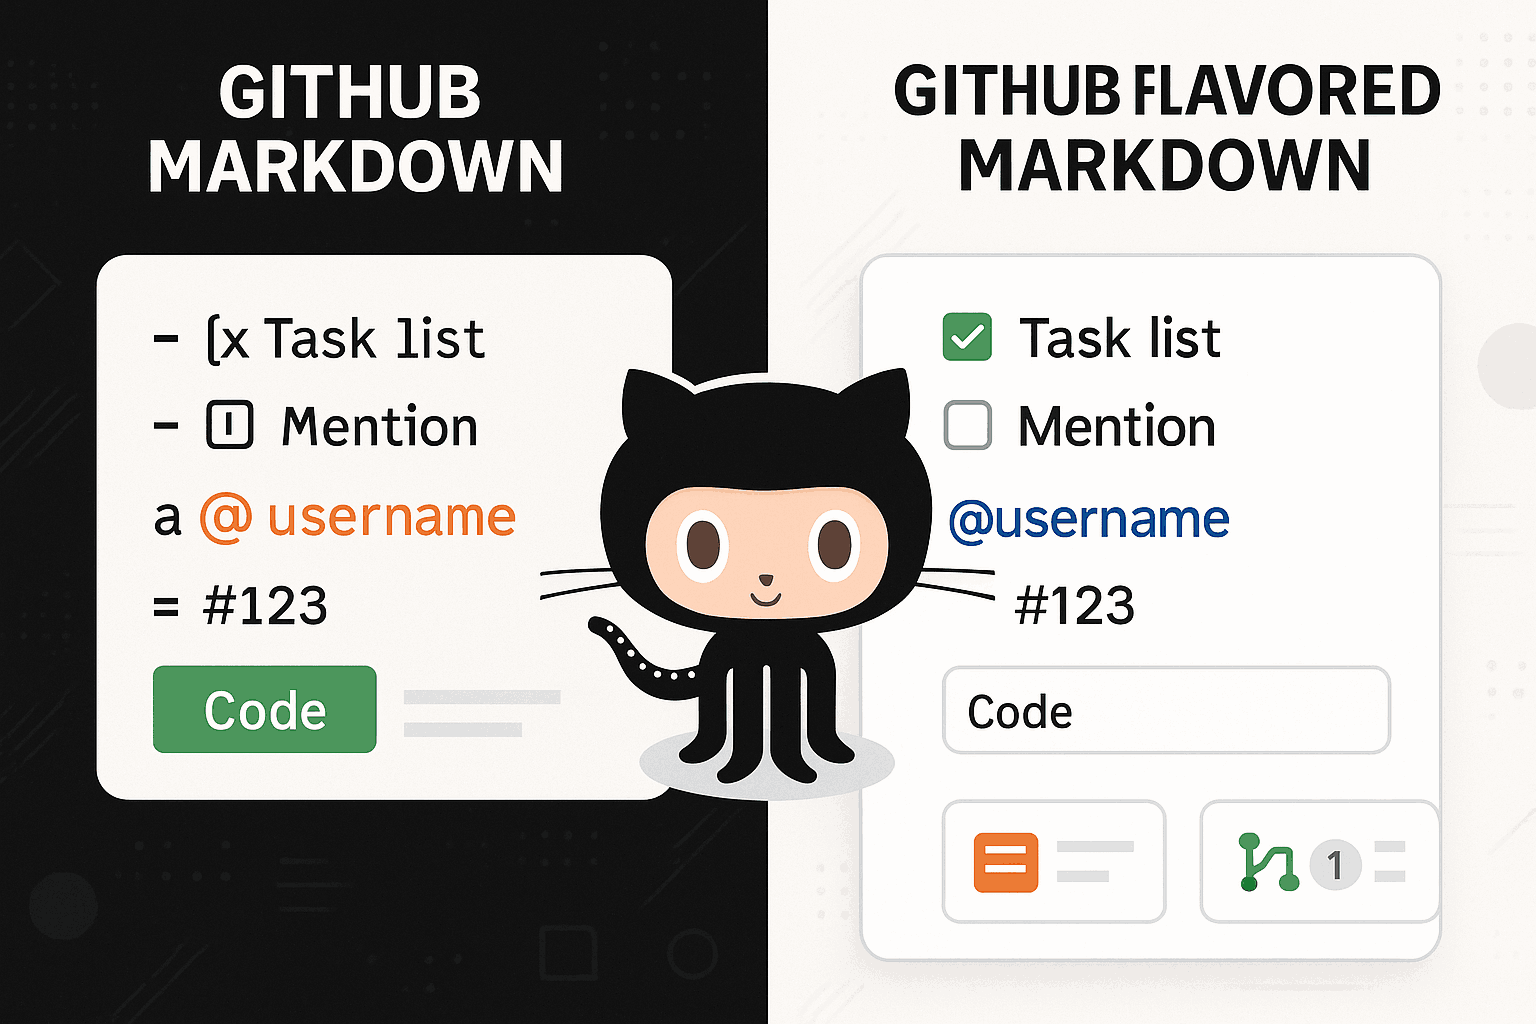
What is GitHub Flavored Markdown
GitHub Flavored Markdown (GFM) is a Markdown dialect developed by GitHub based on the standard CommonMark specification, specifically designed to meet the needs of software development and technical collaboration[2]. Compared to traditional Markdown, GFM not only maintains the original simplicity and readability but also adds a wealth of practical extended features, making it an essential part of modern development workflows.
The core philosophy of GFM is to provide developers with more powerful and professional documentation capabilities while preserving the original advantages of Markdown. This design philosophy is reflected in several aspects: First, GFM is fully compatible with standard Markdown syntax, ensuring seamless migration of existing documentation; second, new features are closely aligned with developers' actual needs, such as syntax highlighting, task lists, and tables; finally, all extended features adhere to Markdown's simplicity principle, avoiding complex syntax structures.
GitHub officially defines GFM as "the dialect of Markdown that is currently supported for user content on GitHub.com and GitHub Enterprise"[3]. This definition emphasizes GFM's practicality and widespread adoption—it is not just a theoretical specification but a proven tool used by millions of developers worldwide.
Differences from Standard Markdown
Understanding the differences between GFM and standard Markdown is crucial for fully leveraging GitHub's documentation features. These differences are primarily reflected in the following aspects:
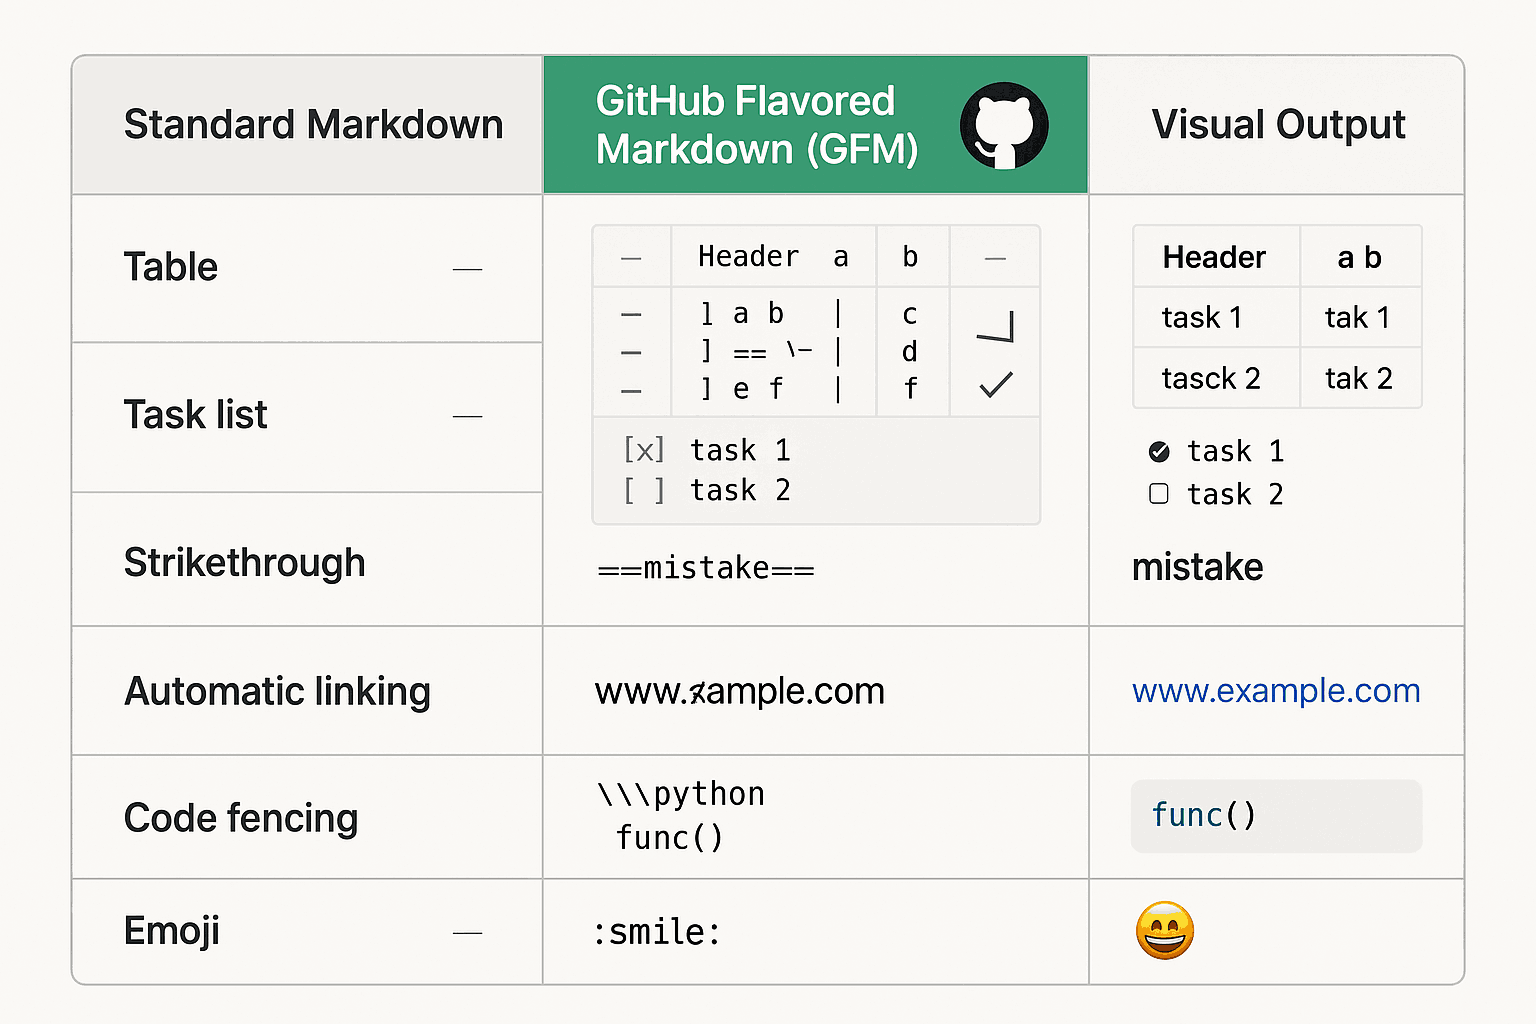
Syntax Extensions: GFM adds several practical features to standard Markdown. Table support is one of the most notable extensions, allowing developers to create structured data displays using simple pipe symbols. The task list feature provides intuitive tools for project management, enabling interactive to-do items to be created directly in documents. The addition of strikethrough syntax makes document revisions and version comparisons more intuitive.
Code Handling Capabilities are another significant advantage of GFM. In addition to supporting standard code block syntax, GFM provides syntax highlighting for hundreds of programming languages. The introduction of fenced code blocks makes inserting and formatting code more convenient. Moreover, GFM supports code diff displays, which are particularly useful for code reviews and version comparisons.
Autolink Features greatly enhance document interconnectivity. In GFM, URLs and email addresses are automatically converted into clickable links without requiring manual Markdown link syntax. This intelligent processing not only reduces writing effort but also improves document readability and practicality.
Integration Features are the most distinctive aspect of GFM. Users can mention other users or teams directly using the @ symbol and reference Issues and Pull Requests with the # symbol. These features deeply integrate documentation with GitHub's collaboration tools, creating an unprecedented collaborative documentation experience.
Applications in the GitHub Ecosystem
GitHub Markdown plays a central role in the entire GitHub ecosystem, with applications spanning all aspects of software development.
Project Documentation is the most fundamental and critical application scenario. README files serve as the face of a project, carrying the important mission of introducing the project to users and contributors. Through GFM, developers can create professional documentation that includes project descriptions, installation guides, usage examples, contribution guidelines, and more. These documents not only provide essential information for project users but also lay the foundation for long-term project maintenance and development.
Collaborative Communication is another important application area for GFM. In Issues and Pull Requests, developers use Markdown syntax to describe problems, make suggestions, and conduct code reviews. GFM's task list feature makes project management more intuitive, allowing team members to create and track to-do items directly in discussions. The mention feature ensures that relevant parties receive timely notifications, improving team collaboration efficiency.
Knowledge Management is well embodied through GitHub Wiki. Teams can use GFM to create detailed technical documentation, API references, best practice guides, and more. The version control features of Wiki, combined with GFM's ease of use, provide an ideal platform for accumulating and passing on team knowledge.
Content Publishing is seamlessly achieved through GitHub Pages. Developers can use GFM to write content and then publish it as a static website via GitHub Pages. This workflow is particularly suitable for technical blogs, project showcase pages, and documentation websites.
Quick Start Guide
For users new to GitHub Markdown, a step-by-step learning approach is recommended. First, familiarize yourself with basic Markdown syntax, including headings, paragraphs, lists, links, and other fundamental elements. If you're not yet comfortable with basic Markdown syntax, we recommend reading our Complete Markdown Guide, which provides a detailed tutorial from scratch.
Next, focus on learning GFM's unique features. Table syntax is one of the most practical features, and mastering it through hands-on practice is advised. The task list feature can be immediately applied to project management to improve efficiency. Code blocks and syntax highlighting are crucial for technical documentation and should be prioritized.
After mastering the basics, delve deeper into GitHub's integration features. Learn how to mention users with the @ symbol and reference Issues with the # symbol—these features will significantly enhance your collaboration efficiency on the GitHub platform.
Finally, consolidate your knowledge through real-world projects. Start by improving existing project README files, then gradually apply GFM in various scenarios like Issues, Pull Requests, and Wiki. Practice is the best way to master any skill, and GitHub Markdown is no exception.
To better understand and apply these concepts, we recommend combining this guide with our Markdown Syntax Deep Dive and Markdown Best Practices for comprehensive learning. These resources will provide you with a more complete Markdown knowledge framework.
Mastering Basic Syntax
While GitHub Flavored Markdown (GFM) extends standard Markdown with numerous additional features, proficiency in the foundational syntax remains a prerequisite for using GFM effectively. GitHub's implementation of basic syntax maintains compatibility with the standard while optimizing details to better suit the needs of development environments.
Headings and Document Structure
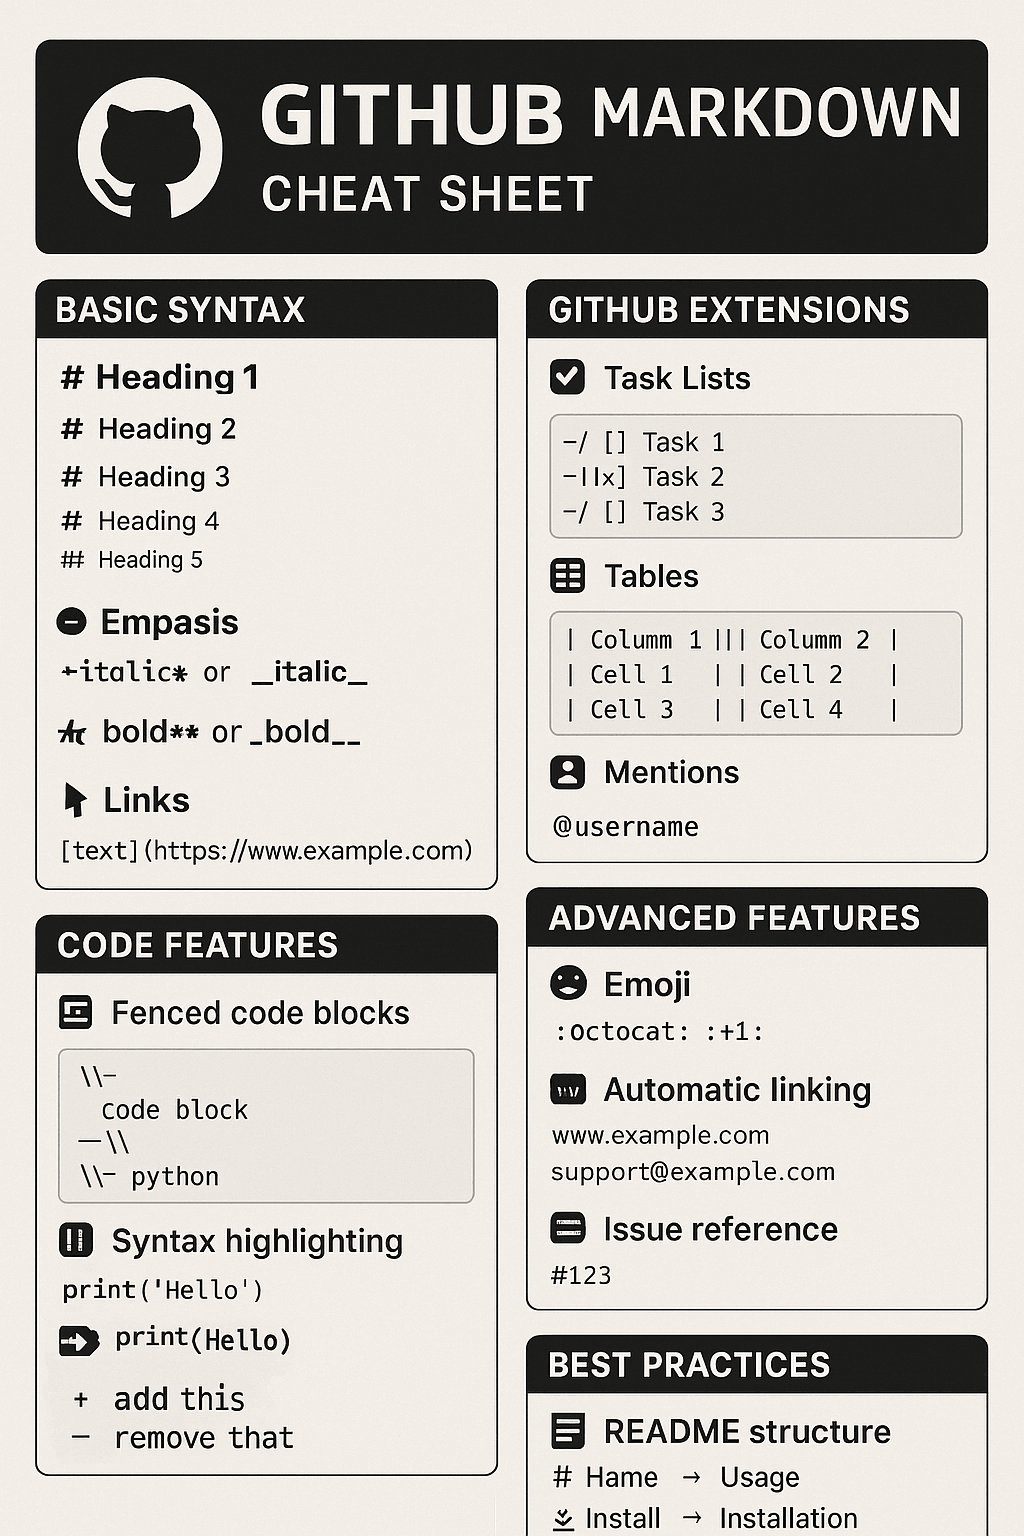
In the GitHub ecosystem, a well-structured document is crucial for project maintainability and user experience. GFM supports two heading syntax styles: ATX-style (using # symbols) and Setext-style (using underlines). However, in practice, ATX-style is widely adopted due to its simplicity and consistency.
ATX-style headings are intuitive—different heading levels are indicated by varying numbers of # symbols. A single # denotes a first-level heading, ## a second-level heading, and so on, up to six levels. In GitHub's rendering environment, these headings not only appear in different font sizes but also automatically generate anchor links, facilitating internal document navigation.
# Level 1 Heading - Project Name

## Level 2 Heading - Core Feature Modules

### Level 3 Heading - Specific Features

#### Level 4 Heading - Implementation Details

##### Level 5 Heading - Code Examples

###### Level 6 Heading - Notes
GitHub's heading rendering includes a key feature: auto-generated anchor links. When users hover over a heading, a link icon appears, allowing them to obtain a direct URL to that section. This functionality is particularly useful for navigating and referencing long documents, especially in API documentation and technical specifications.
Heading hierarchy should adhere to principles of logic and consistency. A well-structured document typically starts with a first-level heading and progresses sequentially, avoiding skipped levels. For instance, jumping from a first-level heading directly to a third-level heading is discouraged. This structured approach not only enhances readability but also aids in automatic table-of-contents generation and navigation.
Text Formatting Techniques
GitHub Markdown offers a variety of text formatting options, each carrying special significance in technical documentation. Bold text is commonly used to emphasize key concepts or critical terms, italic text for denoting variable names or introducing new ideas, while strikethrough proves particularly useful in version update notes.
Bold text can be achieved in two ways: using double asterisks **text** or double underscores __text__. In the GitHub environment, double asterisks are more prevalent as they align with the comment styles of many programming languages, reducing cognitive load.
**Important Note**: This feature has been deprecated in version 2.0.
**Alternative**: Please use the new API interface.
Italic text follows the syntax of single asterisks *text* or single underscores _text_. In technical documentation, italics are often used to indicate parameter names, variable names, or file paths.
Replace _username_ with your actual username.
The configuration file is located at _config/settings.json_.
Strikethrough syntax ~~text~~ is an extension of GFM and is not supported in standard Markdown. This feature is particularly useful in changelogs, release notes, and task lists.
~~Old installation method~~: npm install old-package
**New installation method**: npm install new-package
Combining text formatting can create richer expressive effects. For example, bold and italic combined ***text*** can be used for extremely important emphasis. However, it's worth noting that excessive formatting may reduce document readability, so the principle of "less is more" should be followed.
Paragraph and Line Break Handling
In GitHub Markdown, the handling of paragraphs and line breaks follows specific rules, which are crucial for creating properly formatted documents.
Creating paragraphs requires leaving blank lines between text blocks. This rule aligns with standard Markdown, but in certain GitHub contexts (such as Issues and Pull Request comments), line break handling differs.
This is the first paragraph. It contains some important information.

This is the second paragraph. Note the blank line between paragraphs.
In .md files, a single line break does not create a new paragraph but is instead ignored. If a line break within a paragraph is needed, the following methods can be used:
- Add two spaces at the end of the line
- Use a backslash
\at the end of the line - Use the HTML
<br>tag
This is the first line
This is the second line (using two spaces)

This is the first line\
This is the second line (using a backslash)

This is the first line<br>
This is the second line (using an HTML tag)
However, in GitHub's Issues, Pull Requests, and comments, single line breaks are automatically converted to <br> tags, making it more intuitive to write multi-line text in these environments.
Quotations and Code
Quotations are widely used in technical documentation, from citing official documents to showcasing user feedback. GitHub Markdown's quotation syntax uses the > symbol and supports multi-level nesting and complex content structures.
The basic quotation syntax is simple—just add a > symbol before each line:
> This is a quotation block.
> It can span multiple lines.
Multi-level quotations are achieved by increasing the number of > symbols:
> This is a first-level quotation.
>
> > This is a second-level quotation.
> >
> > > This is a third-level quotation.
Quotation blocks can include other Markdown elements, such as headings, lists, and code blocks:
> ## Important Update
>
> In version 2.0, we introduced the following new features:
>
> - Improved performance
> - New API interfaces
> - Better error handling
>
> ```javascript
> const newFeature = () => {
>   console.log("Hello, World!");
> };
> ```
Code representation is crucial in technical documentation. GitHub Markdown provides two primary methods for displaying code: inline code and code blocks.
Inline code is enclosed in backticks and is suitable for mentioning function names, variables, commands, etc., within paragraphs:
Use the `git clone` command to clone a repository.
The `console.log()` function is used for debugging output.
Code blocks come in two syntaxes: indented and fenced. Indented code blocks are created by adding four spaces or a tab before each line:
    function hello() {
        console.log('Hello, World!');
    }
Fenced code blocks use triple backticks, a GitHub Flavored Markdown (GFM) extension and the recommended approach:
```javascript
function hello() {
  console.log("Hello, World!");
}
```
Fenced code blocks have the advantage of specifying the programming language, enabling GitHub to provide syntax highlighting. Supported languages include but are not limited to JavaScript, Python, Java, C++, HTML, CSS, SQL, and hundreds of other programming and markup languages.
Links and Images
Links and images serve as vital bridges connecting documents to external resources. GitHub Markdown builds upon standard syntax with additional convenient features, making link creation and management more efficient.
The basic link syntax uses square brackets for the link text and parentheses for the URL:
[GitHub Official Site](https://github.com)
[Project Documentation](./docs/README.md)
GitHub supports relative links, which are particularly useful for interconnecting internal project documentation. Relative links are automatically resolved based on the current file's location:
[Installation Guide](docs/installation.md)
[API Reference](../api/reference.md)
Reference-style links offer better maintainability, especially in lengthy documents:
This is a link to [GitHub][1].
Here's another link to [Stack Overflow][2].

[1]: https://github.com
[2]: https://stackoverflow.com
Autolinks are a GFM feature where URLs and email addresses are automatically converted into clickable links:
Visit https://github.com for more information.
Contact us: [email protected]
Image syntax is similar to links but prefixed with an exclamation mark:


GitHub supports drag-and-drop image uploads, greatly simplifying the process of adding images. Simply drag an image file into the editor, and GitHub will automatically upload it and generate the corresponding Markdown syntax.
For scenarios requiring image size control, HTML tags can be used:
<img src="github_workflow_integration.png" alt="Description" width="300" height="200">
Lists and Organizational Structures
Lists are essential tools for organizing information. GitHub Markdown supports ordered lists, unordered lists, and definition lists, each with specific use cases.
Unordered lists use -, *, or + symbols, with - being the most commonly used in GitHub environments:
- First item
- Second item
- Third item
  - Nested item
  - Another nested item
Ordered lists use numbers followed by periods, and GitHub automatically handles the numbering:
1. Step one: Clone the repository
2. Step two: Install dependencies
3. Step three: Run tests
List items can include complex content, such as paragraphs, code blocks, and images:
1. **Install Node.js**

   Download and install the latest version of Node.js from the official website.

   ```bash
   node --version
   ```

2. **Clone the project**

   Use the following command to clone the project locally:

   ```bash
   git clone https://github.com/user/repo.git
   ```
Definition lists, though not part of standard Markdown, are supported in some GitHub environments:
Term 1
: This is the definition for Term 1.

Term 2
: This is the definition for Term 2.
 It can span multiple lines.
Nested lists require consistent indentation. Sublist items should be indented by four spaces or one tab to ensure proper hierarchy.
By mastering these basic syntax rules, you now have the foundational skills to create professional documentation using GitHub Markdown. Next, we will explore GitHub's unique extended features, which will make your documentation even more powerful and practical.
GitHub-Specific Features
The true value of GitHub Flavored Markdown lies in its unique extensions, designed specifically for software development and team collaboration. These features not only enhance the expressiveness of documentation but also deeply integrate it with GitHub's ecosystem, creating an unparalleled collaborative experience.
Task Lists and Project Management
Task lists are one of GFM's most popular features, transforming simple text into interactive project management tools. Their power lies not just in being static document elements but in their dynamic integration with GitHub's Issues and Pull Requests system.
The basic syntax for task lists is straightforward: - [ ] denotes an incomplete task, while - [x] marks a completed one:
## Project Milestone v2.0

### Core Feature Development

- [x] User authentication system
- [x] Database design
- [ ] API development
  - [x] User management API
  - [ ] Data query API
  - [ ] File upload API
- [ ] Frontend interface development
- [ ] Test case writing

### Deployment and Release

- [ ] Production environment setup
- [ ] Performance testing
- [ ] Documentation updates
In GitHub Issues and Pull Requests, task lists are interactive. Users can toggle task statuses by clicking the checkboxes, and these changes are reflected in real-time for all viewers. More importantly, GitHub displays task completion progress (e.g., "3 of 8 tasks completed") next to the Issue or Pull Request title.
Advanced applications of task lists include linking to Issue numbers. By referencing Issues in task descriptions, you can create direct links between tasks and specific work items:
- [x] Implement user login feature #123
- [ ] Add password reset functionality #124
- [ ] Optimize login page UI #125
These links not only provide easy navigation but also automatically update task statuses when referenced Issues are closed. When an Issue is closed, its corresponding task is marked as complete, significantly reducing manual project management efforts.
Task lists also support nested structures, which is particularly useful for breaking down complex projects:
- [ ] Refactor user module
  - [x] Analyze existing code structure
  - [x] Design new architecture
  - [ ] Implement new features
    - [x] User registration
    - [ ] User login
    - [ ] Password management
  - [ ] Write test cases
  - [ ] Update documentation
Advanced Table Usage
Table functionality is a significant extension of GFM compared to standard Markdown, providing powerful tools for displaying structured data. GitHub's table implementation not only supports basic row and column structures but also offers advanced features like alignment and formatting.
The basic table syntax uses pipe characters | to separate columns, with the second line using hyphens - to define headers:
| Feature           | Status      | Owner   | Deadline   |
| ----------------- | ----------- | ------- | ---------- |
| User Login        | Completed   | Alice   | 2024-01-15 |
| Data Export       | In Progress | Bob     | 2024-01-20 |
| Report Generation | Pending     | Charlie | 2024-01-25 |
Column alignment is a key feature of tables, controlled by colons in the separator line:
| Left-aligned   | Center-aligned | Right-aligned |
| :------------- | :------------: | ------------: |
| Content 1      |   Content 2    |     Content 3 |
| Longer content |    Content     |       Content |
Table content can include other Markdown elements such as links, bold, italics, code, etc.:
| Component       |      Status       | Documentation                  | Notes                  |
| --------------- | :---------------: | ------------------------------ | ---------------------- |
| **User Module** |   ✅ Completed    | [API Docs](./api/user.md)      | Tested                 |
| _Auth System_   | 🚧 In Development | [Design Doc](./design/auth.md) | Due next week          |
| `Database`      |    ❌ Pending     | -                              | Depends on user module |
For more complex tables, HTML syntax can be used to achieve advanced features like cell merging, custom styling, etc.:
<table>
  <thead>
    <tr>
      <th rowspan="2">Feature Module</th>
      <th colspan="2">Development Progress</th>
      <th rowspan="2">Owner</th>
    </tr>
    <tr>
      <th>Frontend</th>
      <th>Backend</th>
    </tr>
  </thead>
  <tbody>
    <tr>
      <td>User Management</td>
      <td>100%</td>
      <td>100%</td>
      <td>Alice</td>
    </tr>
    <tr>
      <td>Data Analysis</td>
      <td>80%</td>
      <td>90%</td>
      <td>Bob</td>
    </tr>
  </tbody>
</table>
Best practices for tables include maintaining consistent column widths, using meaningful headers, and appropriately applying alignment features. For large tables, consider pagination or using external tools for generation.
Code Blocks and Syntax Highlighting
Code presentation is a core requirement of technical documentation, and GitHub Markdown offers industry-leading functionality in this regard. From basic code blocks to advanced syntax highlighting, from diff displays to line numbering, GFM's code features can meet almost all the needs of technical documentation.
Fenced code blocks are the recommended method for displaying code, using three backticks to enclose the code:
```javascript
function calculateSum(a, b) {
  return a + b;
}

const result = calculateSum(5, 3);
console.log(`The result is: ${result}`);
```
Syntax highlighting is achieved by specifying the programming language, with GitHub supporting hundreds of programming and markup languages:
```python
def fibonacci(n):
    if n <= 1:
        return n
    return fibonacci(n-1) + fibonacci(n-2)

# Calculate the 10th term of the Fibonacci sequence
result = fibonacci(10)
print(f"The 10th term is: {result}")
```
```sql
SELECT u.username, p.title, p.created_at
FROM users u
JOIN posts p ON u.id = p.user_id
WHERE p.created_at > '2024-01-01'
ORDER BY p.created_at DESC
LIMIT 10;
```
Diff display is an important feature for code reviews, using the diff language identifier:
```diff
function calculateTotal(items) {
-   let total = 0;
+   let total = 0.0;
    for (let item of items) {
-       total += item.price;
+       total += parseFloat(item.price);
    }
    return total;
}
```
Code blocks can also include filenames or descriptive information. While this is not standard syntax, it is supported by some renderers:
```javascript:src/utils/calculator.js
// Calculator utility functions
export function add(a, b) {
    return a + b;
}

export function multiply(a, b) {
    return a * b;
}
```
For scenarios requiring command-line operations, the bash or shell language identifiers can be used:
```bash
# Clone the repository
git clone https://github.com/user/repo.git

# Navigate to the project directory
cd repo

# Install dependencies
npm install

# Start the development server
npm run dev
```
Automatic Links and References
The automatic linking feature greatly simplifies the creation and maintenance of links in documentation. GitHub automatically recognizes and converts various types of references, including URLs, email addresses, issue numbers, pull request numbers, commit hashes, and more.
URL auto-linking is the most basic functionality, where any valid URL is automatically converted into a clickable link:
Visit our official website https://example.com for more information.
Check out the project repository: https://github.com/user/repo
Email addresses are also automatically converted into mailto links:
For any questions, please contact [email protected] or [email protected].
Issue and pull request references are powerful GitHub-specific features. Using the # symbol followed by a number creates a link to the corresponding issue or pull request:
This feature was proposed in #123, implemented in #124, and the related pull request is #125.
Cross-repository references use the format username/repository#number:
This issue is similar to facebook/react#12345.
Refer to the solution in microsoft/vscode#6789.
Commit references use the full SHA hash or the first 7 characters:
This bug was fixed in commit a1b2c3d4e5f6g7h8i9j0.
For related changes, see a1b2c3d.
User and team mentions use the @ symbol:
@username, please review this issue.
@org/team needs to review this.
These automatic linking features not only simplify documentation writing but, more importantly, create organic connections between project content, forming a complete information network.
Deep Application of the Mention System
The mention system is at the heart of GitHub's collaboration features, transforming static documentation into dynamic communication tools. By using the @ symbol, users can directly mention individuals, teams, or organizations within documents. Those mentioned receive notifications, enabling efficient asynchronous communication.
Basic user mentions follow the format @username:
@alice Please review this Pull Request.
@bob Do you have any suggestions for implementing this feature?
Team mentions use the format @organization/team-name:
@company/frontend-team Please review this UI change.
@company/security-team A security review is needed for this feature.
Mentions are particularly useful in Issue and Pull Request templates:
## Security Review Checklist

- [ ] Code Review (@company/code-reviewers)
- [ ] Security Testing (@company/security-team)
- [ ] Performance Testing (@company/performance-team)
- [ ] Documentation Updates (@company/docs-team)

/cc @project-manager @tech-lead
The mention feature can also integrate with automation tools to create intelligent workflows. For example, bots can automatically tag relevant parties when specific conditions are met:
<!-- When CI fails, automatically notify maintainers -->

CI build failed. Please check, @maintainer.

<!-- When a security vulnerability is detected, automatically alert the security team -->

Potential security issue detected. Immediate action required, @security-team.
Color Display Feature
GitHub recently introduced a color display feature, allowing users to showcase color values directly in documents. This is especially useful for design documentation, theme configurations, brand guidelines, and similar scenarios.
Supported color formats include HEX, RGB, and HSL:
Our brand color scheme:

- Primary: `#007bff` (Blue)
- Secondary: `#28a745` (Green)
- Warning: `#ffc107` (Yellow)
- Danger: `#dc3545` (Red)

RGB format:

- Background: `rgb(248, 249, 250)`
- Text: `rgb(33, 37, 41)`

HSL format:

- Accent: `hsl(210, 100%, 50%)`
- Neutral: `hsl(0, 0%, 50%)`
These color values appear as labeled previews in the GitHub interface, allowing users to visualize the colors instantly. This feature is particularly valuable for design system documentation, CSS variable explanations, and theme configuration.
Advanced Application Techniques
Once you've mastered GitHub Markdown's basic syntax and unique features, the next step is learning how to apply this knowledge effectively in real-world projects. Advanced techniques go beyond clever syntax usage—they involve selecting the most suitable methods for different scenarios and understanding how to integrate them with GitHub's other functionalities.
README File Best Practices
README files serve as a project's front door and often form the first impression users have of your project. An excellent README should provide essential information while maintaining good structure and visual appeal.
The basic structure of an outstanding README should include the following sections:
# Project Name
A concise project description explaining the core value proposition in one sentence.

## Features
- ✨ Core Feature 1
- 🚀 Core Feature 2
- 🛡️ Core Feature 3
## Quick Start
### Installation
```bash
npm install project-name
```
### Basic Usage
```javascript
import { ProjectName } from "project-name";
const instance = new ProjectName();
instance.doSomething();
```
## Documentation
- [API Documentation](./docs/api.md)
- [User Guide](./docs/guide.md)
- [FAQ](./docs/faq.md)
## Contributing
Contributions welcome! Please read the [Contributing Guide](./CONTRIBUTING.md).
## License
[MIT](./LICENSE)
Visual elements greatly enhance README appeal. Badges are among the most commonly used visual elements:


Code examples should be runnable and cover the most common usage scenarios:
## Examples

### Basic Example

```javascript
// Create instance
const api = new APIClient({
  apiKey: "your-api-key",
  baseURL: "https://api.example.com",
});

// Get user information
const user = await api.users.get("123");
console.log(user.name);
```

### Advanced Example

```javascript
// Batch operations
const users = await api.users.list({
  page: 1,
  limit: 10,
  filter: { active: true },
});

// Error handling
try {
  await api.users.create(userData);
} catch (error) {
  console.error("User creation failed:", error.message);
}
```
Best Practices and Troubleshooting
After years of development and practice, GitHub Markdown has established a mature set of best practices. These practices not only improve documentation quality but also enhance team collaboration efficiency.
Document Structure Design Principles
Clear hierarchy is the foundation of excellent documentation. Headings should form a clear hierarchical structure, avoiding level-skipping:
# Level 1 Heading - Document Theme

## Level 2 Heading - Main Sections

### Level 3 Heading - Specific Content

#### Level 4 Heading - Detailed Explanations
Appropriate information density means each paragraph should focus on one topic, avoiding information overload:
## Installation Guide

### System Requirements

This software requires the following system environment:

- Node.js 16.0 or higher
- npm 7.0 or higher
- At least 2GB available memory

### Installation Steps

1. **Download Source Code**

   Clone the latest code from the GitHub repository:

   ```bash
   git clone https://github.com/user/repo.git
   cd repo
   ```

2. **Install Dependencies**

   Use npm to install project dependencies:

   ```bash
   npm install
   ```
Code Example Standards
Code examples should be complete and runnable, avoiding omission of key parts:
## API Usage Examples

### Complete Example

```javascript
// Import required modules
const { APIClient } = require("api-client");
const config = require("./config");

// Create client instance
const client = new APIClient({
  apiKey: config.API_KEY,
  baseURL: "https://api.example.com/v1",
});

// Async function example
async function getUserData(userId) {
  try {
    const response = await client.users.get(userId);
    console.log("User data:", response.data);
    return response.data;
  } catch (error) {
    console.error("Failed to get user data:", error.message);
    throw error;
  }
}

// Usage example
getUserData("12345")
  .then((user) => {
    console.log(`Welcome, ${user.name}!`);
  })
  .catch((error) => {
    console.error("Operation failed:", error);
  });
```
Tools and Resources
Choosing the right tools can greatly improve GitHub Markdown writing efficiency and quality. From editors to preview tools, from automation scripts to online services, a rich tool ecosystem provides powerful support for GFM usage.
Editor Recommendations and Configuration
Visual Studio Code is currently one of the most popular Markdown editors, with its rich plugin ecosystem providing comprehensive support for GFM writing.
Recommended VS Code plugin configuration:
{
  "recommendations": [
    "yzhang.markdown-all-in-one",
    "shd101wyy.markdown-preview-enhanced",
    "davidanson.vscode-markdownlint",
    "bierner.github-markdown-preview",
    "mushan.vscode-paste-image"
  ]
}
The Markdown All in One plugin provides a complete Markdown writing experience:
- Automatic table of contents generation
- Table formatting
- Keyboard shortcut support
- Math formula preview
Configuration example:
{
  "markdown.extension.toc.levels": "2..6",
  "markdown.extension.toc.orderedList": false,
  "markdown.extension.list.indentationSize": "adaptive",
  "markdown.extension.tableFormatter.enabled": true
}
Conclusion
GitHub Flavored Markdown has become an indispensable tool in modern software development. From simple project descriptions to complex technical documentation, from personal notes to team collaboration, GFM provides powerful and flexible solutions.
Through this guide, you should now have mastered:
-
Proficient use of basic syntax: From headings to links, from lists to code blocks, each element has its optimal use case.
-
Deep application of GitHub-specific features: Task lists, tables, automatic links, and other features deeply integrate your documentation with GitHub's ecosystem.
-
Practical application of advanced techniques: README optimization, template design, automated workflows, and other skills that enhance documentation professionalism and maintenance efficiency.
-
Systematic understanding of best practices: From structural design to performance optimization, from team collaboration to version control, forming a complete documentation management system.
The value of GitHub Markdown lies not only in its technical features but also in promoting communication and collaboration between developers. Excellent documentation is an important factor in project success, and GFM provides the ideal tools for creating such documentation.
As technology continues to evolve, GitHub Markdown is also continuously advancing. New features and capabilities are constantly being added, making it more powerful and user-friendly. Staying current with learning and practice, and keeping up with the latest developments, will help you always master the newest capabilities of this important tool.
Finally, remember that the core goal of documentation is to provide value to users. No matter how advanced the techniques used, they should always center on user needs, creating clear, accurate, and useful content. GitHub Markdown is just a tool—the real value lies in the knowledge and information you want to convey.
If you wish to further enhance your Markdown skills, we recommend continuing with our other related tutorials: Advanced Markdown Techniques will provide you with more advanced application techniques, helping you become a Markdown expert.
References
[1] GitHub. "GitHub Flavored Markdown Spec." GitHub, 2019. https://github.github.com/gfm/
[2] CommonMark. "CommonMark Spec." CommonMark, 2021. https://spec.commonmark.org/
[3] GitHub Docs. "Basic writing and formatting syntax." GitHub, 2024. https://docs.github.com/en/github/writing-on-github/getting-started-with-writing-and-formatting-on-github/basic-writing-and-formatting-syntax
[4] Gruber, John. "Markdown: Syntax." Daring Fireball, 2004. https://daringfireball.net/projects/markdown/syntax
[5] GitHub. "Working with advanced formatting." GitHub Docs, 2024. https://docs.github.com/en/github/writing-on-github/working-with-advanced-formatting
[6] Stack Overflow. "GitHub Flavored Markdown Questions." Stack Overflow, 2024. https://stackoverflow.com/questions/tagged/github-flavored-markdown
[7] Mozilla Developer Network. "HTML elements reference." MDN Web Docs, 2024. https://developer.mozilla.org/en-US/docs/Web/HTML/Element
[8] W3C. "HTML Living Standard." WHATWG, 2024. https://html.spec.whatwg.org/
[9] GitHub Community. "GitHub Community Forum." GitHub, 2024. https://github.community/
[10] Atlassian. "Markdown syntax guide." Atlassian Documentation, 2024. https://confluence.atlassian.com/bitbucketserver/markdown-syntax-guide-776639995.html